Every pool loses some water to evaporation, in Southern California, that is a fact of life. But when you are adding inches every week, running the fill valve constantly, or watching the water bill climb with the pool, you are past evaporation and into leak territory. The question is where: the shell, the skimmer, the underground plumbing, or the equipment pad.
Pool and spa leak detection answers that systematically: first ruling out evaporation with a simple bucket test, then pressure-testing each plumbing line independently, then using dye testing and electro-acoustic listening to pinpoint the breach. No draining the pool on a hunch, no digging up decking to look around.
Last updated: October 13, 2026
Signs Your Pool or Spa Is Leaking
You add more than a quarter-inch of water per day in mild weather
The water level drops faster with the pump running than when it is off
Wet spots, sinking pavers, or unusually lush landscaping near the pool
Air in the pump basket, gurgling, or the pump losing prime
Cracks in the shell, coping, or around skimmers and fittings
Higher water bills that track with pool refilling
Evaporation or Leak? The Bucket Test Decides
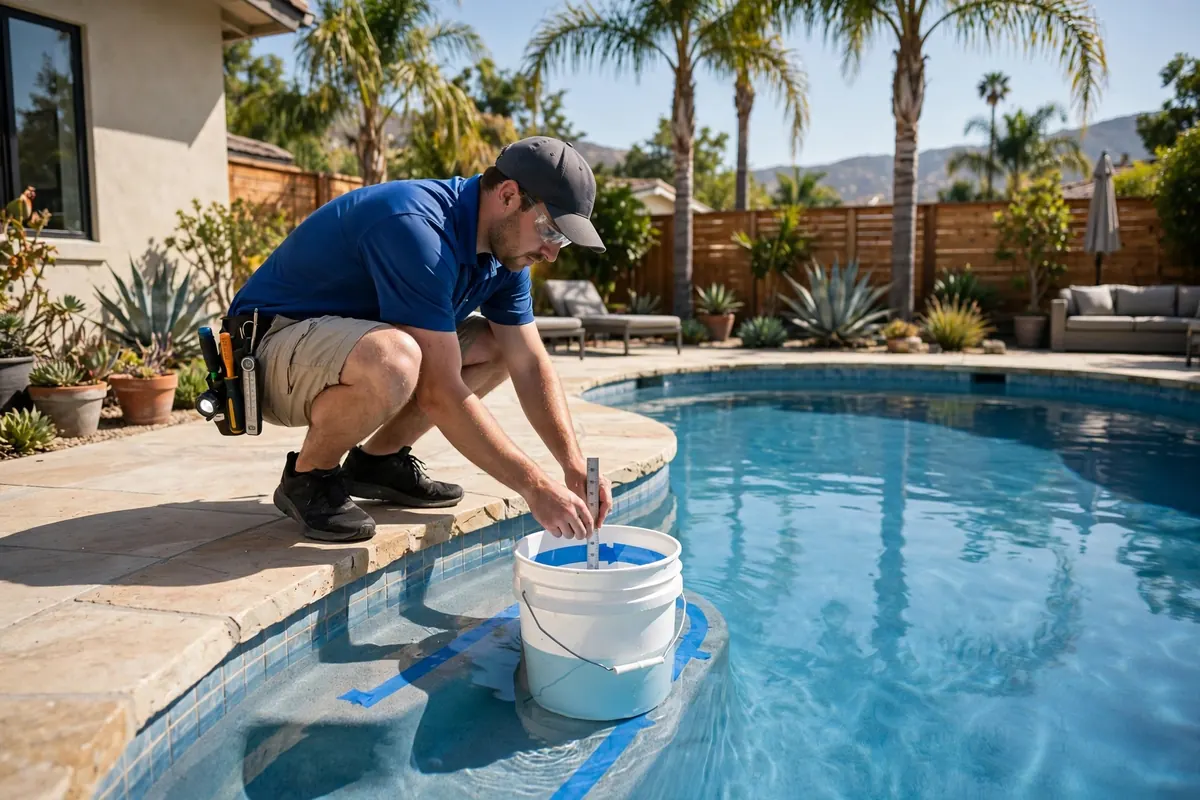
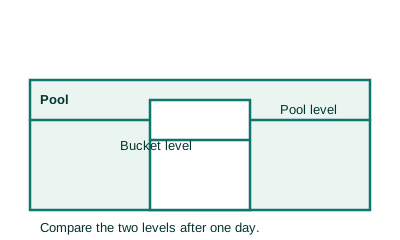
Direct answer: The bucket test tells a pool leak apart from evaporation in a day. Place a bucket on a pool step, mark the water level inside the bucket and in the pool, then compare after 24 hours, pump off. If the pool level drops more than the bucket level, water is escaping somewhere other than evaporation, and the pool needs detection.
Pool water loss: evaporation or leak?
What you see
More likely
Next step
Pool and bucket drop by the same amount
Evaporation
Keep monitoring, no detection needed
Pool drops more than the bucket
Leak
Repeat the bucket test with the pump off, then call for detection
Level falls only when the pump runs
Pressure-side plumbing leak
Pressure-test each line
Level falls only when the pump is off
Suction-side or shell leak
Dye test around fittings, then detection
Wet deck or soggy soil near equipment
Equipment or return-line leak
Inspect the equipment pad, then pressure testing
Air bubbles in return lines
Suction-side air leak
Check the pump lid, unions, and skimmer
Before any equipment comes out, the honest first step is the bucket test: fill a bucket with pool water, set it on a pool step so the water levels inside and outside match, and mark both. After 24 hours with the pump off, compare. If the pool dropped more than the bucket, the difference is a leak, not evaporation.
This simple test prevents the most common pool-owner mistake, paying for leak detection on a pool that is simply evaporating in Santa Ana winds. If the bucket test says leak, the investigation proceeds with confidence. If it says evaporation, you have saved yourself the call-out.
Where Pools Actually Leak
Pool leaks fall into three zones. Structural: cracks in the plaster, gunite, or tile grout; failed seals around skimmers, returns, lights, and main drains; coping separation. Plumbing: the underground suction and return lines, skimmer lines, main drain lines, cleaner lines, which can crack from ground movement, root pressure, or age. Equipment: the filter, pump seals, heater, valves, and above-ground plumbing on the equipment pad, which are the easiest to check and often the culprit.
Each zone gets a different test, which is why a methodical sequence matters more than any single gadget. Jumping straight to excavation without isolating the zone is how pool decks get destroyed unnecessarily.
Pressure Testing Each Line Independently
The core diagnostic is line-by-line pressure testing. Each plumbing run, skimmer, main drain, each return, the cleaner line, is plugged at both ends and pressurized independently. A line that holds pressure is eliminated; a line that drops is the leaker. This single procedure narrows the search from 'somewhere in the pool system' to one specific pipe.
Once the leaking line is identified, electro-acoustic listening traces it underground, the same principle used for buried water mains, adapted for pool plumbing, to mark where along that run the breach sits. For structural suspects, a dye test with the pump off shows dye being drawn into cracks or failed seals, visible to the trained eye.
Spas and Hot Tubs
Spas leak by the same mechanisms, shell fittings, jets, plumbing, and equipment, concentrated into a smaller, more complex footprint. A spa that needs frequent refilling, shows wetness around its base, or trips its heater from low water deserves the same systematic approach: evaporation check, equipment inspection, then line isolation.
Because spa plumbing is dense and often foam-insulated, detection here leans heavily on pressure testing individual runs and careful equipment-pad diagnosis before any surface is opened.
Our Pool and Spa Leak Detection Process
Bucket test review
We start with evaporation ruled out, via your bucket test results or a fresh one, so the investigation targets a real leak.
Equipment-pad inspection
Pump, filter, heater, valves, and above-ground plumbing are checked first; the simplest causes are eliminated early.
Line pressure testing
Each underground line is plugged and pressurized independently to identify exactly which run is losing water.
Pinpointing
Electro-acoustic listening traces the leaking line underground; dye testing checks structural suspects like skimmers and fittings.
Marked findings
The leak's location, shell, line, or equipment, is documented so repair addresses the actual breach, nothing else.
How pinpointing changes the job: 5 illustrative examples
The examples below are illustrative. They show how pinpointing typically changes a job. They are not reports of specific customer jobs, and they name no customer, address, date, or price.
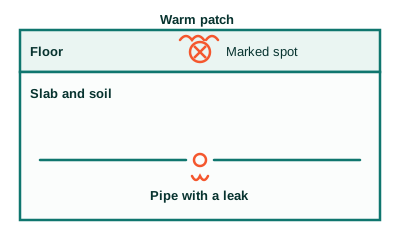
1. A warm spot on the floor
Illustration: Slab cross-section with one marked spot
Before: A homeowner notices one warm patch on the floor and a bill that keeps climbing, but no visible water. Without instruments, the only way to find the leak would be to open large areas of flooring and guess.
Method: The technician checks the meter, isolates the hot-water line, then combines thermal imaging with acoustic listening to follow the heat and sound to one point.
After: The leak is marked on the floor at one spot. Any repair opens that spot only, and the rest of the floor stays intact.
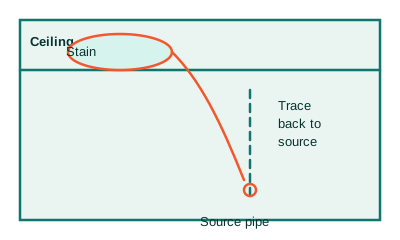
2. A stain on the ceiling
Illustration: Ceiling stain traced back to its source line
Before: A brown stain spreads across a ceiling, but the pipe above it may run several feet away. Opening the ceiling at the stain alone often misses the source and means opening more drywall later.
Method: The technician maps the damp area with thermal imaging and moisture readings, then checks pressure and nearby lines to trace the water back to its source.
After: The source line is identified and marked. Any opening is made where the leak actually is, not where the stain happens to show.
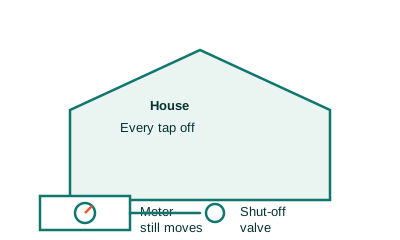
3. A meter that moves with everything off
Illustration: Meter test with every tap off
Before: Every tap is off, yet the water meter still moves. That proves water is leaving the system somewhere, but it says nothing about where. Digging or opening walls at this point would be pure guesswork.
Method: The technician runs a timed meter test, then isolates lines one by one with pressure checks to narrow the loss to a single line.
After: The search area shrinks from the whole property to one line. Pinpointing then focuses on that line only, before anything is opened.
4. A pool that keeps losing water
Illustration: Bucket test comparing pool and bucket levels
Before: A pool loses water faster than normal, but some loss is normal evaporation. Draining the pool or digging up pipes without a test would waste water and money.
Method: The technician runs a bucket test to separate evaporation from a real leak, then pressure tests each line on its own to find which line loses pressure.
After: If the pool is only evaporating, no repair is needed. If one line fails, the search narrows to that line instead of the whole pool system.
5. Slow drains and a sewer odor
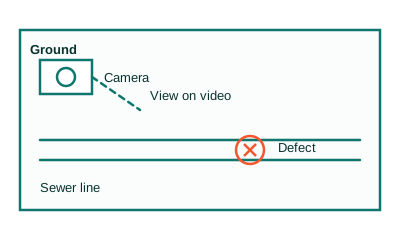
Illustration: Camera inspection showing a defect inside the line
Before: Drains run slow and a sewer odor lingers, but the blockage or break could sit anywhere along the line. Digging to find it would disturb the yard and still might miss the defect.
Method: The technician sends a camera through an existing access point and watches the inside of the line on video, marking where roots, cracks, or offsets appear.
After: The defect is seen on video and its position is known. Any digging happens at that one place, after the cause is already clear.
Frequently Asked Questions
Is my pool leaking or just evaporating?
Do the bucket test: a bucket of pool water on the pool step, levels marked inside and out, pump off for 24 hours. If the pool level dropped more than the bucket's, you have a leak. In Alhambra's climate, up to about a quarter-inch per day can be evaporation; consistently more than that warrants investigation.
How do you pressure-test pool lines?
Each line, skimmer, main drain, returns, cleaner, is plugged at both ends and pressurized on its own. A line that holds pressure is cleared; one that loses pressure is the leaker. This isolates the problem to a single pipe before any pinpointing begins.
What is a dye test for pool leaks?
With the pump off and water still, dye is released near a suspected crack, fitting, or seal. If there is a breach, the escaping water draws the dye in, making the exact spot visible. It is the standard check for structural and fitting leaks.
Can you find the leak without digging up my yard or deck?
Yes, detection itself involves no digging. Electro-acoustic listening traces the leaking underground line and marks its position on the surface, so any repair excavation targets one precise spot rather than trenching the whole run.
What are the most common pool leak locations?
Skimmer seals and throats, return and light fittings, main drains, cracks in the shell or coping, and the underground suction/return lines. On the equipment pad, pump seals, filter housings, and valve joints are frequent culprits.
Should I call a pool company or a leak detection specialist?
For maintenance and equipment issues, your pool company. For a confirmed-but-unlocated leak, water disappearing with no visible cause, a detection specialist with pressure-testing and acoustic equipment will find it faster and with less disruption.